What’s a girl to do with old worn out blue jeans and a pile of fabric scraps? Why, make a denim apron for the kids, that’s what!

I stumbled across a post recently, on facebook or pinterest or following a rabbit trail of some kind where a mom had cut off the legs of old blue jeans and refashioned them into aprons for her children. I knew in a moment it must be St. Nick! an idea for some little ones on my Christmas list. You can see the full post that inspired me along with a terrific step-by-step guide at Happy Hooligans where Jackie shows off her oh-so-cute denim aprons.
I have a feeling Jackie and I are not the only ones with a stack of worn out blue jeans and a pile of scraps just waiting for some fabulous project. Am I right? Then . . .

Let’s get started on your Fast & Easy Denim Apron!
Choose a pair of jeans, rips and stains and worn out spots add to the charm and can easily be covered or disguised.
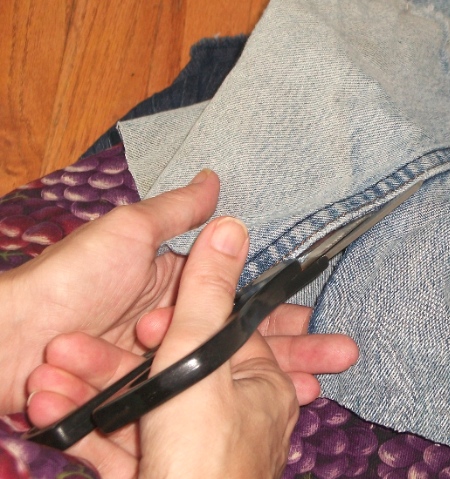
Cut off the leg of the jeans. Then cut closely down along the entire length of the seam. (Cut down the inseam if you’d like to have the finished outer seam showing on the front of your apron.)

Open leg, lay flat and either trace out apron pattern freehand or using an apron pattern or even an apron you have on hand (this is what I did). I used the finished hem of the leg to the top of the apron, but if it works better for your pattern you can flip it around and use the finished hem as the hem of your apron. I used chalk to trace the shape, but you could use pins to hold pattern in place. As you cut out your apron shape you’ll want to save some of the seam edgings and scraps for the straps later on.

Before you do any sewing, decide what embellishments you’d like to add. I used a cookie cutter and scrap fabric to cut out ‘patches’. On one apron it was just for the pure cuteness factor. On the other, it was to cover over a hole in the knee. I also carefully cut out a back pocket to use over that hole.

Before you attach pocket, embellish with whatever means you’ve chosen. I fussy-cut the little kitties from my fabric using the heart-shaped cookie cutter as a template, then used a fusible web type product to attach the layers together. You could add beads, buttons, embroidery, or store-bought patches.
For added interest and to make sure the patch is secure I used a decorative stitch with contrasting thread on my sewing machine, quickly stitching around the outside of the shape.

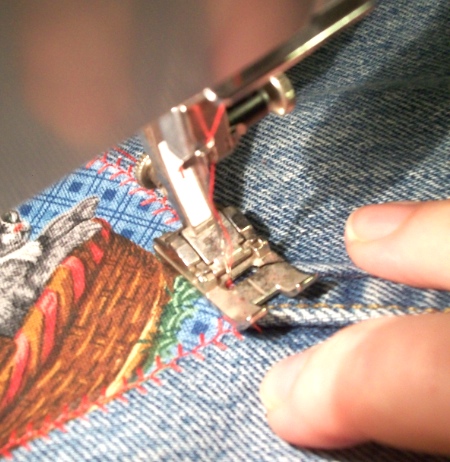
Now it’s time to hem! Finish off all raw edges be turning them under and hemming on the machine. This could be done by hand, but you’ll want to have callouses built up! I recommend using a heavy duty or denim needle. Some of the layers can be quite thick.

Now take (or cut) some of the hemmed seams and edges you have left over and cut three strips – 1 for around the neck, 2 for ties around the waist. You could also use ribbon, cording, seam binding, etc. Sew one end of the neck strip to a top front corner of your apron. To secure the other end, add hook and loop tape or a button and button hole, leaving extra length for adjusting and for growth. Attach one end of each of the other 2 ties to the two sides, leaving enough length on each to tie around the back.

And your done! How easy was that? Fact is, it took me longer to write this post than it took me to sew up 2 aprons! Now if you happen to see the two most adorable granddaughters on this planet, don’t tell them what Grandma has been stitching up. These aprons are sure to be found under the Christmas tree this year!
This is the ninth post in my Aprons – a 31 Day Series. You’ll find them all listed by clicking on the image below. You’ll find hundreds of series written by some amazing bloggers at Write31Days.com. I’ve pinned, bookmarked and subscribed to several so I can follow along. You just might be inspired, encouraged, and make some new friends along the way – come join us!

{sharing this post at some of these wonderful places}
What a great idea for a kid’s gift!! You’ll have some happy little ones at Christmas time! 🙂
thank you, Cheryl. I’m excited to share these little aprons – all my grandchildren love helping in the kitchen and the garden, so I know they’ll be put to good use 🙂
you won’t believe how many jean and cloth scraps I have here….well actually you might lol. love this pattern, thanks for sharing the tutorial on how to make an easy denim apron for kids! pinned and saving 🙂 If you haven’t before, I hope you will stop by our Snickerdoodle Sunday link party sometime!
thanks, girls! I DO know what it’s like to have a a large stash of potential 😉 so glad you lilke the pattern – I’ll stop by on Sunday for your Snickerdoodle party – thanks for the invite!
Thanks for partying with us 🙂
Hi there! Thanks for visiting my blog. I think we both linked up with Essential Things Devotions. I love this little apron for kids. Such a great idea, and everyone has worn-out jeans. (I saw in another post that you always wear an apron. That made me smile because I put one on to cook lunch and keep it on until dinner many days!)
Hello, Betsy! I’m so glad you stopped by for a visit today. Your post spurred me on to good works today 😉 This little denim apron could be adapted for adults, I think, by adding more denim panels. And yes, it’s a rare day I don’t wear my apron. It has been noted by my children that I not only wear through lunch and dinner but have also been known to hop in the car forgetting I was wearing it! hmmm, that might have to be another apron post, what do you think?
Oh those aprons look darling what a great gift idea.
thank you, Wanda 🙂
Super cute~ Thanks for linking up!
Great idea Linda! I think this would work with my pile of worn out denim skirts too! I like the little embellishment idea also 🙂 Thanks for sharing your wonderful posts at the Art of Home-Making Mondays this week!
Thank you JES 🙂 My girls and I were actually talking about using similar panels to make a tiered skirt. Looks like I’ve added yet another project to my to-do list!
What a cute apron! I like that it’s made out of denim.
I still have my apron my mom made me when I was about 4 years old (I’m 46 now).
Thank you Shelly 🙂 I always love a project that uses scraps, and if it means having a new apron in the end, so much the better!
That apron your mom made for you is very special – I’m so glad you still have it! Hoping my girls are able to keep theirs for many years to come 🙂
and I love your potholders! looks like a great project for me to do with my girls <3